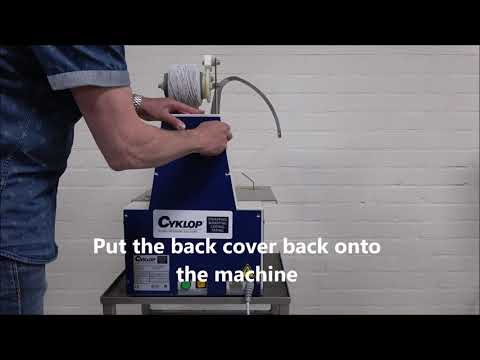
To extend the life of the machine, it is important to maintain the machine from time to time. This video shows you how to maintain the B6.
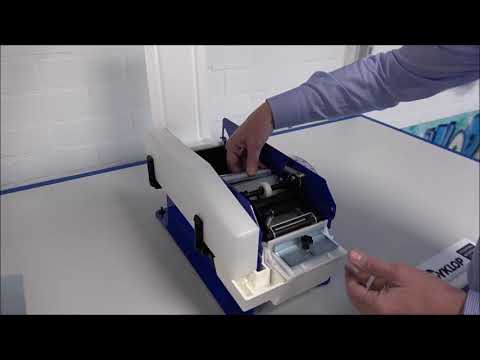
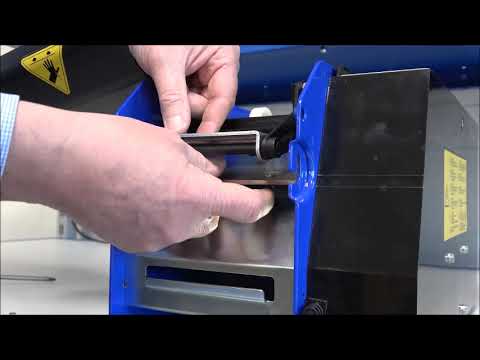
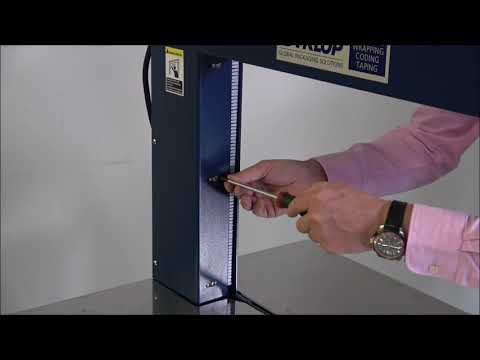
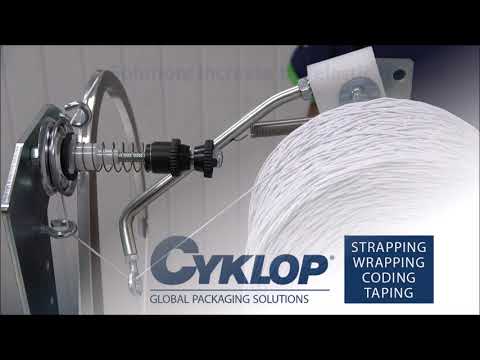
In this video you can see how to properly install the B6 tape dispenser.
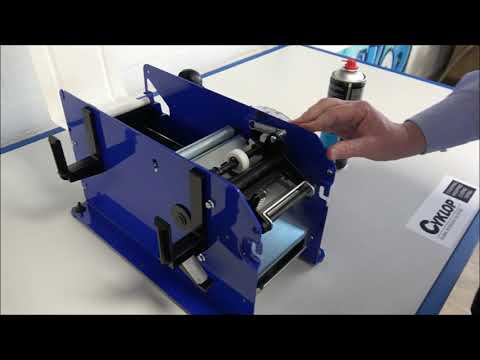
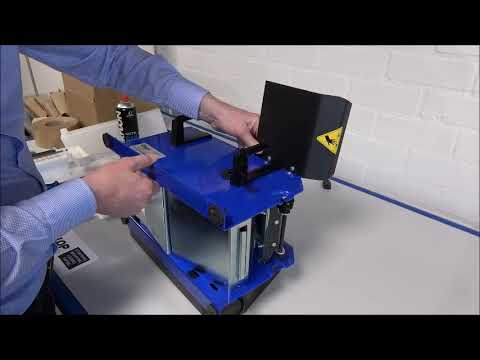
Using a machine correctly extends its lifespan. This video shows you how to properly use the B6 paper tape dispenser.
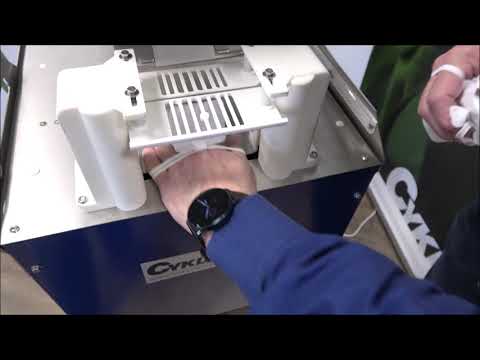
Elastobinder: Turning on the machine
In this video you can see how to turn on the Elastobinder so that the machine is immediately ready for use. The Elastobinder in the video has a label unit on the machine, but Elastobinders without a label unit also work this way.
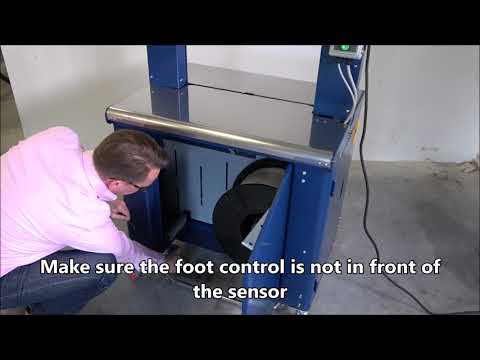
CSM 211 / 212 / 213: Repair defect
The robot wrapper may malfunction. This video shows you how to fix this.
CSM 211 / 212 / 213: Charging the battery
The CSM robot wrappers are flexible machines that require the battery to be charged from time to time. This video shows you how to connect the machine to the charger.
CSM 211 / 212 / 213: Placing wrapping film
To wrap pallets properly, it is important that the film roll is placed correctly. You can see how to do this in this video.
CSM 211 / 212 / 213: Turning on the machine
In this video you can see how to properly turn on the robot wrapper.
CSM 211 / 212 / 213: Attaching the bumper
A bumper is attached to the robot wrapper that detects when the machine hits something. When this happens, the machine stops immediately. This video shows you how to attach the bumper.
CSM 211 / 212 / 213: Attaching the wheel
This video shows how to attach the wheel to the robot wrapper.
CSM 211 / 212 / 213: Unpacking the machine
When you receive the robot wrapper, it will be well packed. This video shows you how to unpack the machine without damaging it.
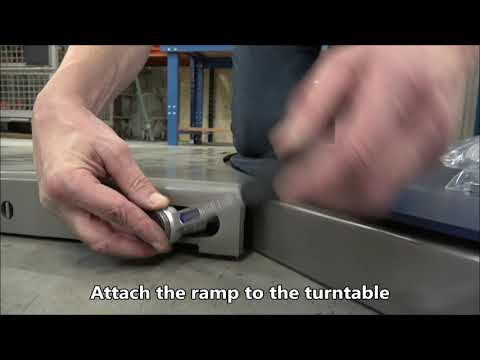
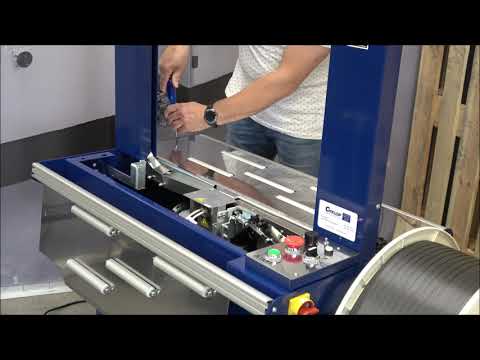
CTT 230: Installing the ramp
The CTT 230 has a ramp that makes it easy to place pallets on the wrapper. This video shows you how to mount this ramp to the machine.
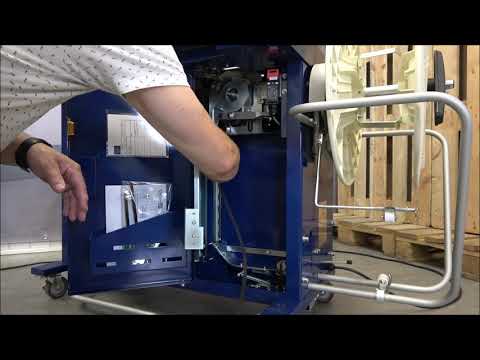
CTT 230: Unpacking the machine
When you receive the CTT 230, the machine must first be unpacked. This video shows you how to properly unpack the machine, so there won't be any damage.
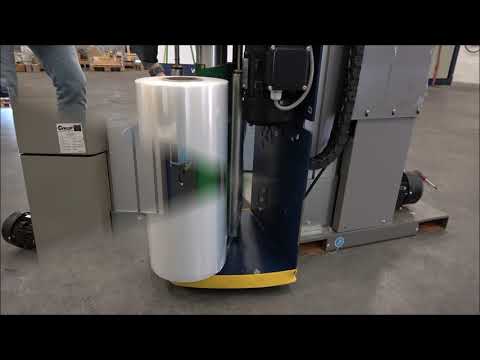
CTT 230: Insert wrapping film roll
Feeding the wrapping film through the film cart correctly is crucial for a properly wrapped pallet. This video explains how to properly insert the film roll.
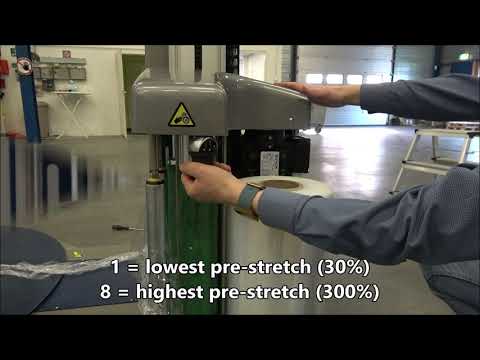
CTT 230: Adjusting the pre-stretch
The pre-stretch on a CTT 230 can be adjusted up to 300%. For example, more film (4 meters) is stretched from 1 meter of film. This video shows how to change the pre-stretch settings.
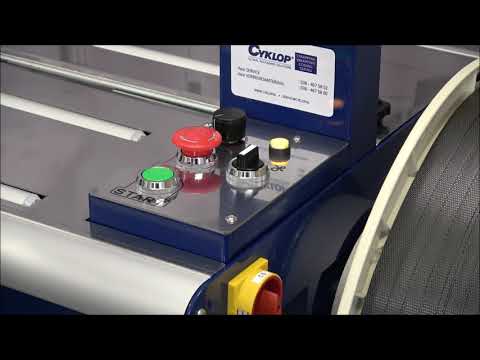
CTT 230: Adjust photocell
The photocell can be adjusted to create more overlap of the wrapping film on the top of the pallet. This video shows you how to do that yourself.
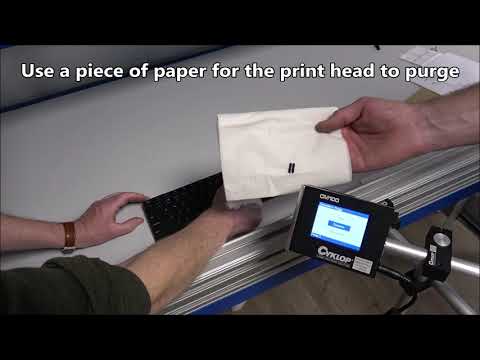
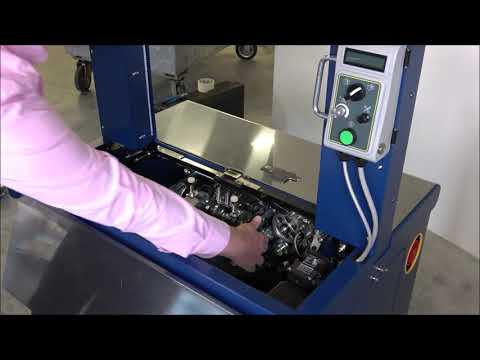
CM 100: Malfunction – the system is not printing properly
It is possible that your CM 100 malfunctions. This could be due to a clogged printhead. You can fix this by purging the printhead. This video shows you how.
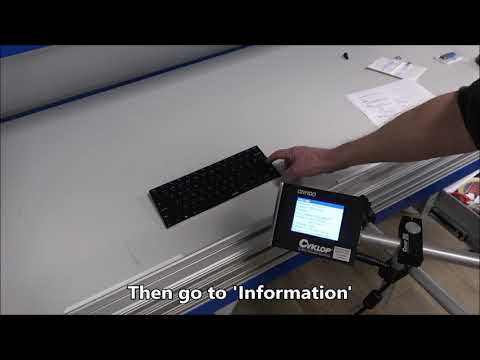
CM 100: Check the ink level
To check how many prints you can still make with the current cartridge, you can easily check the ink level. This video shows you how.
CM 100: Malfunction – Ink Out
It may happen that the CM 100 gives the error 'Ink Out'. This video shows you what you can do best.
CM 100: Select existing program
You can store several programs on the CM 100. This way you can easily switch text or message to be printed. This video explains how to do that.
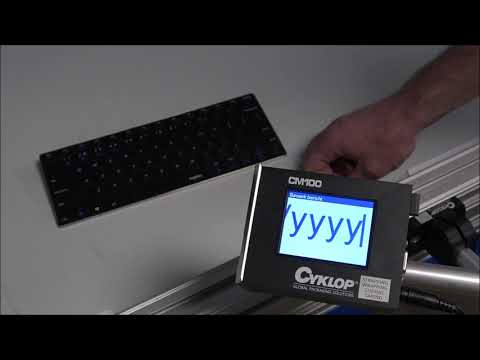
You can create various messages on the CM 100 coding system. This video explains how to do that.
Our CM 100 coding systems are ideal for printing barcodes. In this video you can see how you can easily set the barcode yourself.
CM 100: Set the best before date
With the CM 100 you can set Best Before dates. This video shows you how.
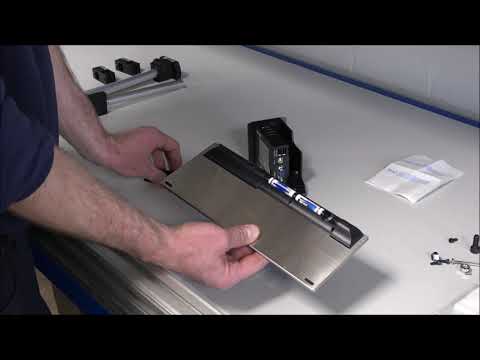
CM 100: Mount the holder and printer
To ensure that the printer is stable in the line, it is important to mount the holder correctly. This video shows you how.
CM 100: Insert, remove and clean cartridge
Correctly inserting the cartridge into the printer is crucial for a good print. Maintenance is also important. This video shows you how to properly insert, remove, and clean the cartridge.
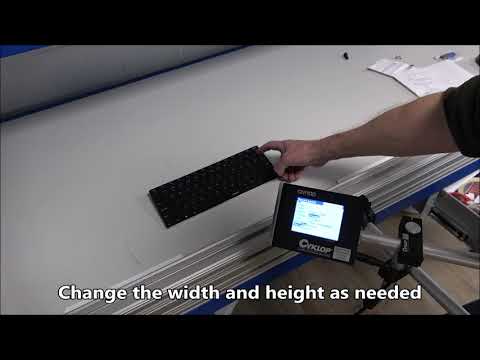
You can easily change the settings of the CM 100 yourself. You can see how in this video.
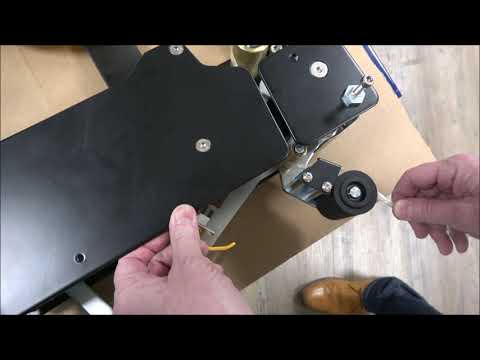
CM 100: Connect the printer
The CM 100 is easy to connect yourself. This video shows you how.
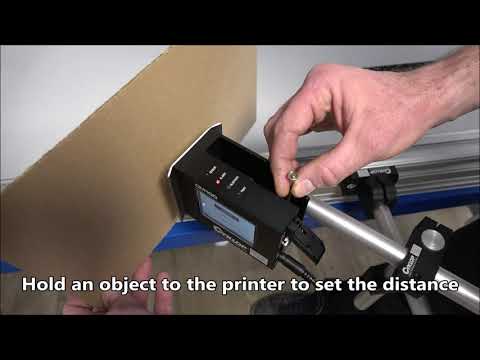
CM 100: Adjust internal photocell
This video shows you how to properly adjust the internal photocell so that the system can make the print.
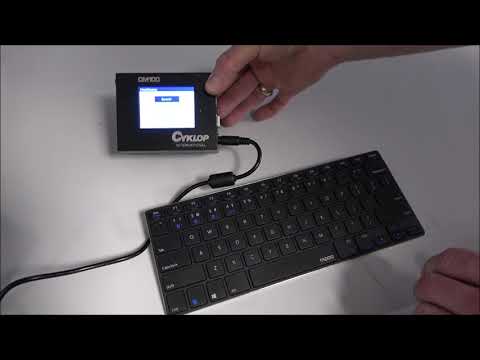
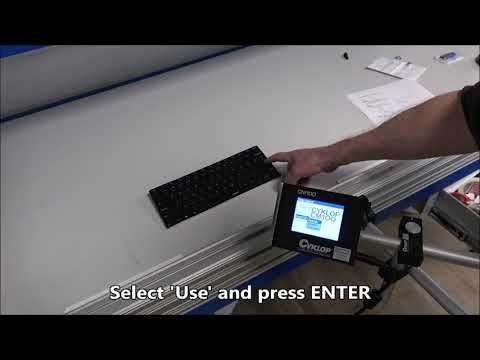
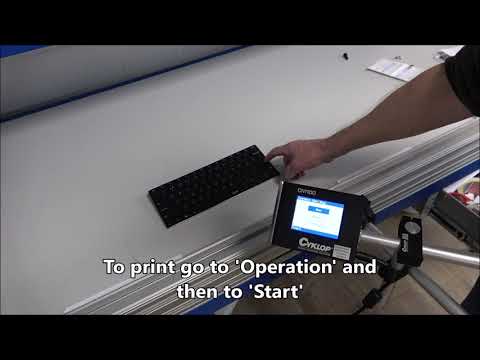
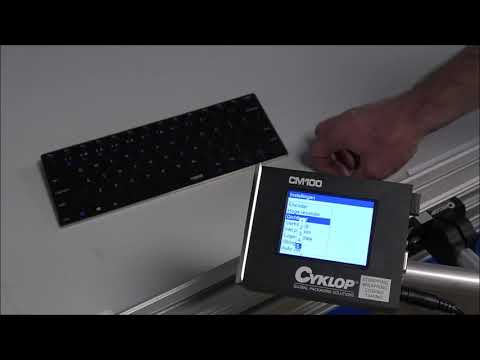
CM 100: Start using the keyboard
To edit the programs of the CM 100 and to use the system you must have the keyboard installed. This video shows you how to do that.
CT 103 SD: Adjust tape head spring tension
The CT 103 SD can tape a variety of boxes, including very light boxes. The spring tension on the machine must be properly adjusted in order to properly apply the tape to light packaging. This video shows you how to adjust the spring tension.
CT 103 SD: Align the tape head
To tape boxes in the middle, it is important to properly align the tape head. This video shows you how.
In order to tape the packages correctly, it is important that the tape is correctly placed in the machine. In this video you can see how to attach a roll of tape to the machine.
CT 103 SD: Align the tape head with the machine
The pressure on the tape head can influence the result of the taping. To properly tape a package, it is important to align the tape head with the machine. This exerts the correct pressure on the box.
CT 103 SD: Attaching roller conveyors
The CT 103 SD has roller conveyors to make it easier to load packages. This video shows you how to attach the roller conveyors to the machine.
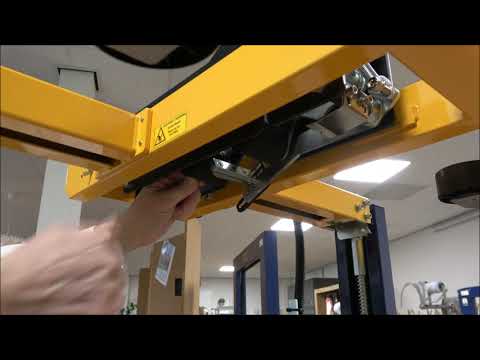
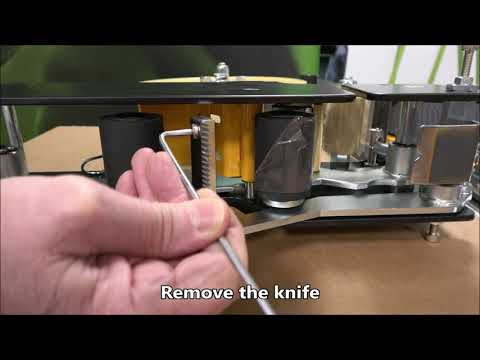
CT 103 SD: Replacing the knife
After some time, the knife of the taper can become blunt and the tape cannot be cut properly. You can easily replace the blade yourself. This video shows you how.
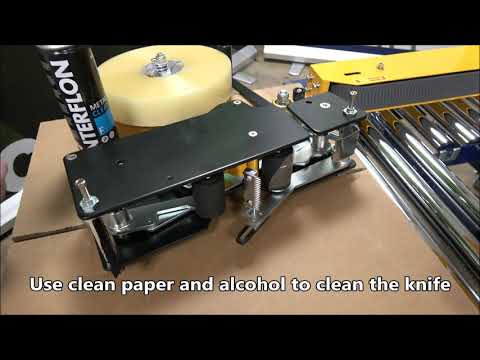
CT 103 SD: Clean the knife
It is possible that the tape is no longer cutting properly because tape residues remain on the knife. You can clean the knife so that the tape is properly cut again.
CT 103 SD: Adjust height of machine
The CT 103 SD taper is adjustable in height to increase ease of use. In this video you can see how to adjust the height of the machine.
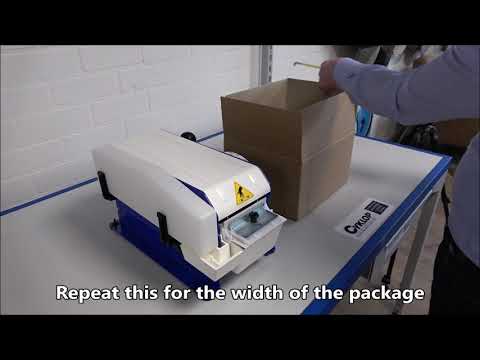
CT 103 SD: Setting box dimensions
The CT 103 SD can be adjusted to the box to be taped. This way you always get a perfectly closed package. This video shows you how to adjust the machine to the correct height and width of the package.
Lapomatic: Replacing the knife
The Lapomatic cuts the paper tape with a sharp knife. It may happen that the knife wears out due to the many uses and as a result the tape no longer cuts properly. You can easily replace the blade yourself. You can see how in this video.
Lapomatic: Cleaning the roll
Maintaining the machine properly means a longer machine life. In this video you can see how to clean the roll of the Lapomatic.
Lapomatic: Adjusting temperature of the heating plate
You can easily change the temperature of the Lapomatic heating plate yourself. This video shows you how.
Lapomatic: Replacing the coil springs
The coil springs may lose strength after some time. These are easy to replace yourself. This video shows you how.
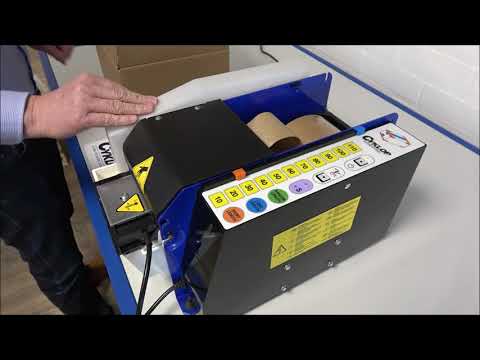
Lapomatic: Cleaning the machine
To extend the life of a machine, it is important to maintain it properly. This video shows you how to maintain the Lapomatic.
The paper adhesive tape dispenser Lapomatic is an electrical tape dispenser for gummed paper tape. Suitable for sealing large numbers of packages.
Lapomatic: Programming different tape lengths
To make taping with the Lapomatic easier, you can set the different box lengths. This way you get the correct length of tape from the machine at the touch of a button. This video shows you how to change the settings.
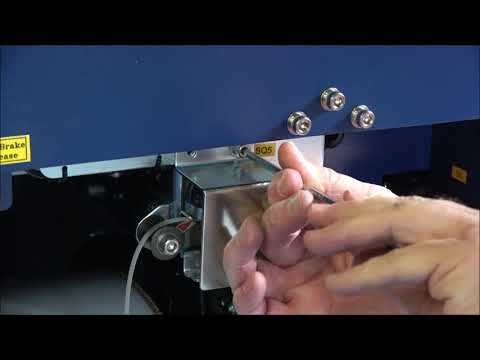
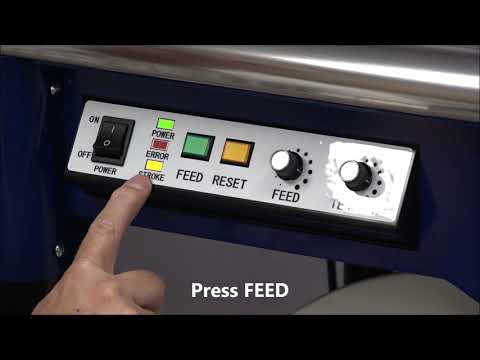
Ampag Speed: Malfuntion SQ 5
If the Ampag Speed indicates malfunction SQ 5, the strap feed is blocked. This video shows you how to unblock the strap.
Ampag Speed: Change band frame width
The band frame of the Ampag Speed can be widened or reduced so that the different widths of strapping material are properly fed through the machine. In this video you can see how to adjust the width of the band frame.
Ampag Speed: Cleaning the machine
Regular good cleaning of the Ampag Speed will extend the life of the machine. Cleaning is best done with compressed air. Watch the video to learn how to clean the machine.
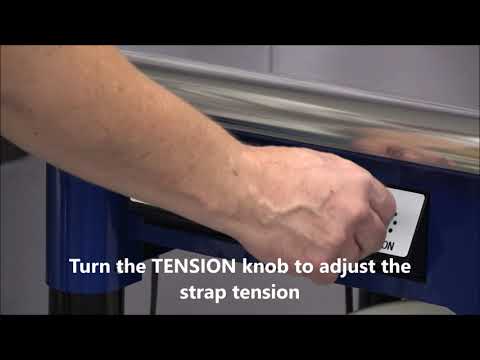
With the Ampag Speed you can strap in two ways: with low tension or with high tension. This video shows you how to strap in both ways.
Ampag Speed: Removing strap
You can easily change straps on an Ampag Speed. This video shows you how.
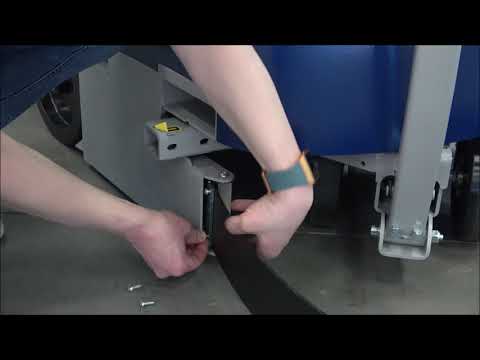
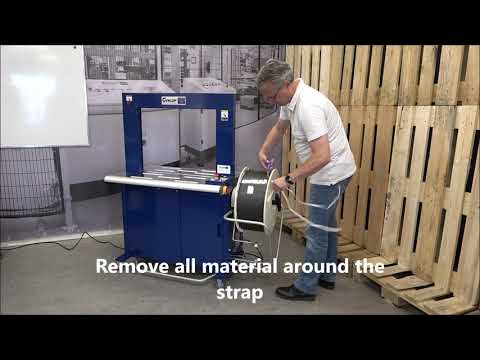
Ampag Speed: Inserting strap
The strapping material goes into the Ampag Speed in a specific way, so that it feeds smoothly into the machine. This video shows you how to correctly insert the strap.
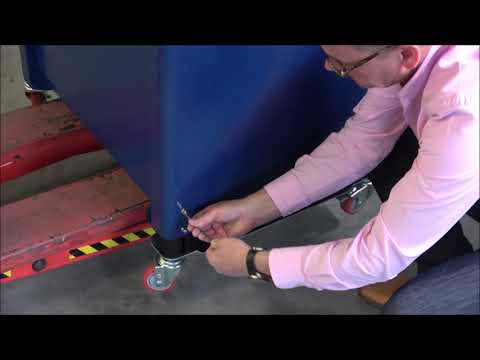
Ampag Speed: Change the heigt of the machine
You can easily increase or decrease the height of the Ampag Speed for comfortable operation. All you need is a pump truck and an Allen key. In the video you can see how to raise the machine.
Ampag Speed: Malfunction SQ 9
When the machine is switched on, it may indicate the error SQ 9. This is because the foot pedal has shifted due to lifting with the pallet truck. Fortunately, this can be easily remedied. Watch the video to learn how to resolve this fault.
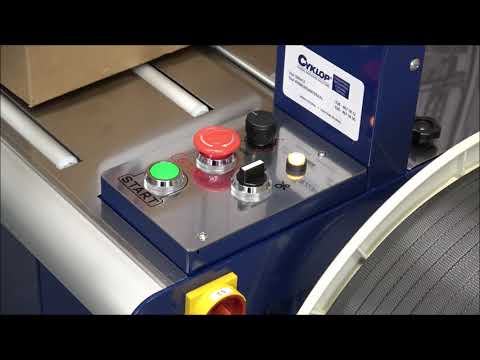
Ampag Speed: Turn on the machine
The Ampag Speed needs to be turned on in two steps. In this video you can see which two actions these are.
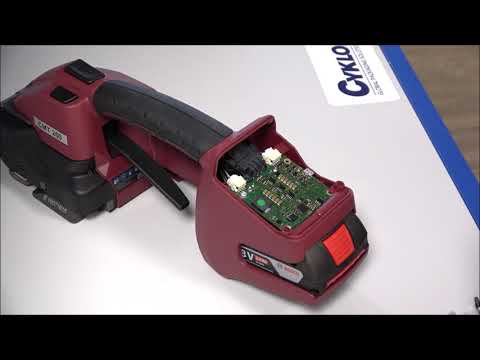
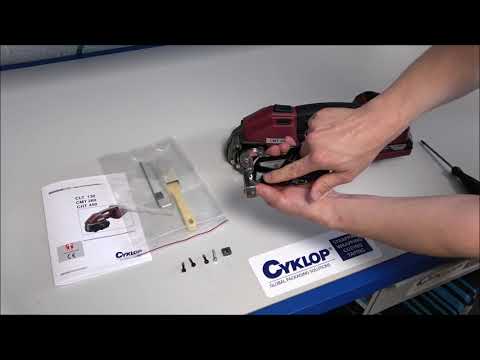
CMT 260 / CHT 450 / CLT 130: Replacing display
The display of our hand strapping devices can be replaced if necessary. You can easily do this yourself. In this video you can see how.
CMT 260 / CHT 450 / CLT 130: Attaching the bracket
A hanging bracket can be attached to our hand strapping devices, making it easier to move the device. This video shows how the bracket can be attached.
CMT 260 / CHT 450 / CLT 130: Attaching the protective plate
Our hand strapping devices can be used in any environment. It is a good idea to protect your device properly when strapping raw materials such as bricks. This video shows you how to attach the protective plate.
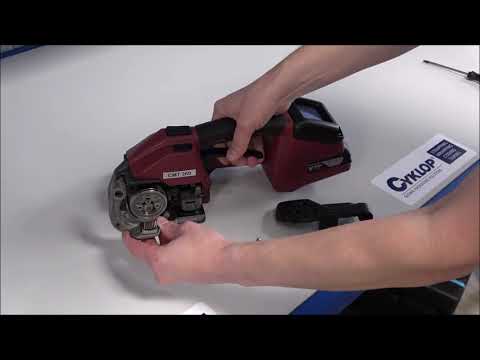
CMT 260 / CHT 450 / CLT 130: Cleaning the tensioning wheel and gear
To guarantee a long service life for your hand-held device, it is important that you properly maintain the device. This video shows you how to clean the device's tensioning wheel and tooth plate.
CMT 260 / CHT 450 / CLT 130: Changing settings
You can change various settings on our hand strapping devices. You can set the voltage as well as the way of strapping. There are even more settings that you can change yourself. In this video you can see how to change these settings.
CMT 260 / CHT 450 / CLT 130: Installation
The device must be installed before you can use your new hand-held strapping device. This video shows you how to get the device ready for use.
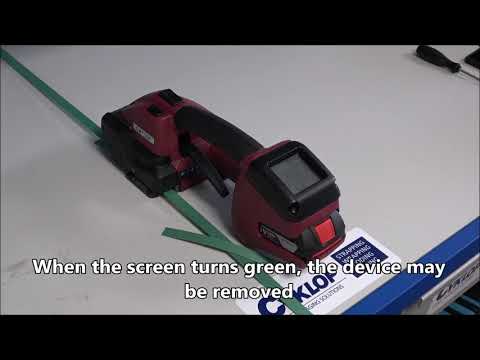
CMT 260 / CHT 450 / CLT 130: How to use
Proper use of strapping devices extends the life of the device. This video shows how to best use the hand strapping devices.
CMT 260 / CHT 450 / CLT 130: Three ways of strapping
With the hand-strapping devices you can strap in three ways: automatic, semi-automatic and manual. In this video you can see how to set up the three different ways and how to make the strapping.
CMT 260 / CHT 450 / CLT 130: Setting bandwidth
With our hand strapping devices you can strap with 13 mm strapping material and 16 mm strapping material. You can easily change the strap guide yourself so that you can switch between different strap types. This video explains how to switch from 13 mm strapping band to 16 mm strapping band.
CMT 260 / CHT 450 / CLT 130: Cleaning the device
Cleaning a hand-held strapping device is important to ensure that the device can last as long as possible. This video shows you how to properly clean the device.
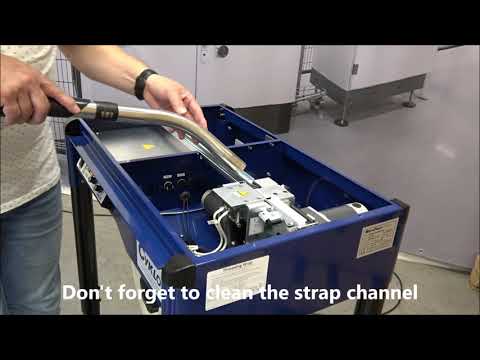
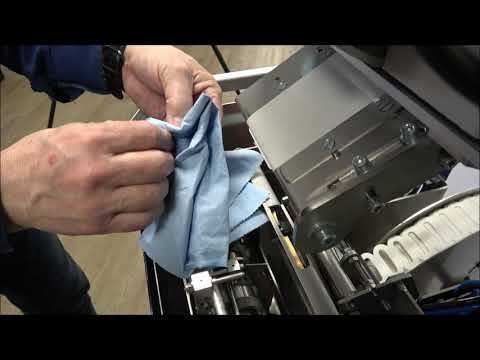
Ampag Boxer II: Cleaning the machine
In this video we show you how you can easily clean your Ampag Boxer II strapping machine.
With a periodic cleaning and inspection service you keep your machine in top condition. This ensures that you can be sure that your machine will continue to do well and the service life will be extended.
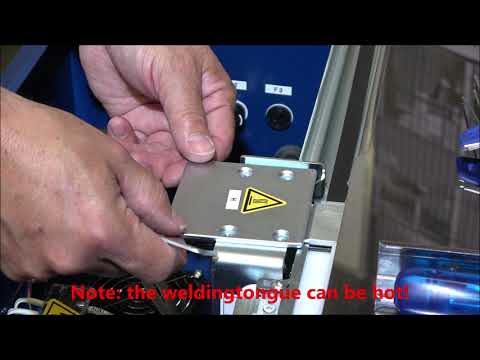
Ampag Boxer II: Cleaning the welding tongue
In this video you can see how to clean the welding tongue.
Maintaining the strapping machine is important in order to be able to use it for as long as possible. In addition, it is essential to keep the welding tongue clean so that the strap is properly welded together.
Ampag Boxer II: End of roll
To insert a new roll of strap into the machine, the remaining strap must first be removed. In this video you can see how you can do that.
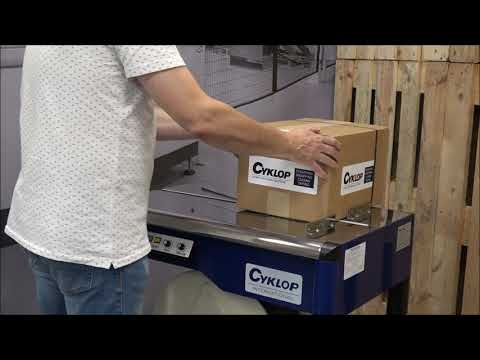
Ampag Boxer II: How to use
The Ampag Boxer II is a semi-automatic strapping machine for strapping different sizes of packages. It is important to use the machine correctly in order to extend the service life. In this video you can see how to use the machine correctly.
Ampag Boxer II: Inserting strap
To be able to use the Ampag Boxer II, a strapping band must first be entered. In this video you can see how to enter the strap correctly.
Ampag Boxer II: Removing strap
The strap tension can be adjusted on an Ampag Boxer II. In this video you can see how.
Ampag Boxer II: Setting tension
The strap tension can be adjusted on an Ampag Boxer II. In this video you can see how.
M-Pac V: Setting stroke and torque
In this video you can see how the tension can be adjusted for stroke and torque. With the M-Pac V it is possible to choose between two types of strap tension: stroke tension (suitable for light straps / products that damage quickly) and torque tension (build up more tension).
M-Pac V: Setting strap length and tension
The strap length on the M-Pac V can be manually extended and shortened. It is also possible to adjust the strap tension.
M-Pac V: Insertion of strap
When the machine is started up, a strap must be inserted before you can get started. In this video you can see how the strap is inserted correctly.
Using the machine properly ensures that the service life is extended.
In this video you can see how to use the M-Pac V correctly.
M-Pac V: Cleaning the welding tongue
Maintaining the strapping machine is important in order to be able to use it for as long as possible. In addition, it is essential to keep the welding tongue clean so that the strap is properly welded together.
M-Pac V: Cleaning the machine
With a periodic cleaning and inspection service you keep your machine in top condition. This ensures that you can be sure that your machine will continue to do well and the service life will be extended.
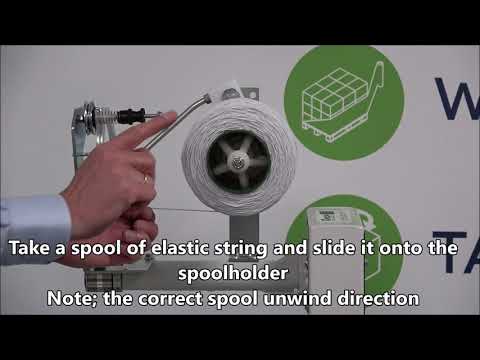
Elastobinder: Installing labels
The Elastobinder can be equipped with a printer and labels. In this video you can see how to mount the ribbon and labels correctly on the machine.
Elastobinder: Cleaning the machine
A machine will last longer if it is properly maintained. In this video you can see how to properly clean the Elastobinder.
Elastobinder: Label doesn’t come out correctly
A label must come straight out of the Elastobinder to achieve the best result. However, the label can sometimes shift so the label is not correctly attached to the Strepper®. This video shows how to fix this problem.
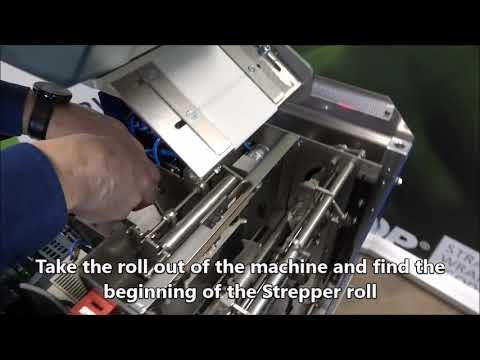
Elastobinder: Strepper error
A Strepper® can be entered incorrectly. This problem is easy to fix yourself. In this video you can see how.
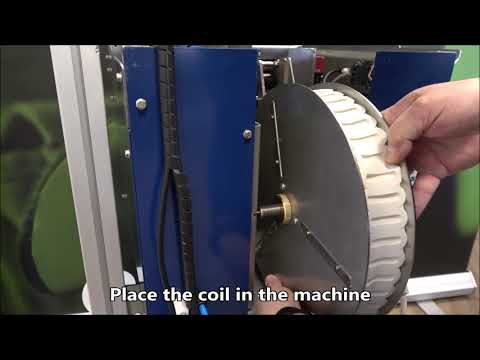
Elastobinder: Installing Strepper roll
This video shows you how to install the Strepper roll in the Elastobinder. This makes the machine ready for use.
In this video you can see how to properly set up the AXRO FQC2. Make sure to attach the parts in the right way.
AXRO FQC2: Setting elastic tension
It is possible that the elastic is not cut after a knot has been made. A solution is to increase the elastic tension. In this video you can see how.
AXRO FQC2: Assemble and adjust knotter beak
In this video you can see how to assemble and adjust the knotter's beak in the right position. This makes the knots in the elastic the right way.
AXRO FQC2: Needle doesn’t return to starting position
It can happen that the needle of the elastic binder does not return to the starting position after making a knot. This is easily remedied yourself. In this video you can see how.
AXRO FQC2: Elastic isn’t cut correctly
It is possible that the elastic is not cut after a knot has been made. A solution is to increase the elastic tension. In this video you can see how.
AXRO FQC2: Elastic cannot be inserted into the machine
It is possible that the elastic cannot be fed into the machine. This video shows what you can do if this happens.
AXRO FQC2: Machine keeps on running
For the machine to run smoothly, it is important that the settings are properly set. In this video you can see how to properly adjust the initiator.
AXRO FQC2: Elastic doesn’t insert into the machine
If the elastic is not inserted correctly, it is useful to look at the rotor and the unit part. Aligning these two can solve this problem.
AXRO FQC2: Change pre and after switch
On the AXRO FQC2 you can change the pre and after switch. In this video you can see how you can do that.